Tuesday, October 29, 2013

Gallery Wall Is Up!

After two years of living here, I have made a LOT of holes in the walls. After patching some up and not wanting to do that again, here's what I've learned.

Be patient. Instead of rushing to hammer in a nail to put up that new frame, play around with everything first. Lay it all down on a large table or on the floor, like so.


Those large canvases are a diy, one inspired by the West Elm version. I wanted to make them cohesive, so they all use black, gray, white, and gold. I'm constantly adding more art as I find it/create it. 

Also, 3M tape! Their velcro strips hold up to seven pounds each for the medium size so no more holes! 

Girl Crush: Clare Elsaesser

I don't have the budget for "real" art. Between school, work, and you know, buying a thousand cups of yogurt on which to subsist while I go to school and work, there's not much left to invest in good art at the moment. But if I did somehow have the money, I'd buy everything this gal made.


I would love to add the Walking Trees to my gallery wall in the living room and will be my first "real" art purchase. Can't wait! 


Look What I Found!

Apologies for the weeks of nothingness on the blog! Nothing's really happened on the home front except... Ikea came to my house! They came for a little interview and to take a look at my home. It was a team of three wonderful gals dressed in those not so wonderful yellow Ikea shirts. We ate J's famous snickerdoodles and went over some questions, took some pictures, had an amazing time, blah blah. They probably say it to everyone, but they said our home was the BEST! I'll take it.

Other than that, the real meaning of this post is to go over my lucky garage sale finds. I forgot to take a picture of the items as they were on the street, but this is one of them:


They were two for $20! The seller's grandma lived in Japan in the 40's and 50's. Everything is solid wood, although the finish on them was bad, the metal was tarnished, and some hardware (those decorative circles) was missing. I wanted to modernize it a bit so I took off the handles (there are tiny knobs on the circle plates in the middle) and the decorative circles and painted it charcoal. All those metal details were hammered in so I had to painstakingly paint around every edge. Each one took about 90 minutes. Below is when the paint was still drying. 


Good ole' after. 


Total cost for this project was $20 but if you don't have paint and a brush, those would cost you about $15. Have you found any bargains lately? 


Saturday, August 3, 2013

Belated Updates

I've been completely gone off the blog, my apologies. I've just been swamped with work, vacation plans, scheduling, school, general running around the city-ness, blah blah. Yet... I have not completed anything and I have two blank canvases sitting right next to me. Hopefully this week will see more action on the blog.

In the bedroom, where my desk is, I changed the ledge from black to white to lighten up the wall. I added my leopard clutch to the frames up there and finally bought a clear acrylic tray for the desktop. It ties in with the clear acrylic chair and it only costs $7 from Hobby Lobby! Buying an actual tray would have been at least $40 and this is actually a picture frame you can find here. Just pop out the cardboard back and voila! Cheap-a$$ tray.


These dinosaurs are also from Hobby Lobby. Originally, they look like this:

After some gold rub n' buff, they become these beauts. You can turn them into magnets, cake toppers, place card holders, pretty much anything, but for now they're just in the clear tray for some added masculinity. Because dinosaurs are manly. Even if they're gold. 

And two coffee plants that are still alive three days later. Chilling in the living room. 

Ellie was curious. And she's an attention-whore. And photo-bombed my picture.
\

Have a great weekend, everyone! 

I Got One Too

Everyone is getting one of these Vittsjo pieces from Ikea.


A few weeks ago, I was perusing CL and found the nesting coffee tables. I left the tab open for J and less than 24 hours later, we brought it home for less than half price. 
For now, its just the original black, but I think I want to paint it gold. Or not. I'm not sure. I'm wildly indecisive. I'll be back in like... five minutes with another post with some updates. 

Friday, July 19, 2013

Naked and Bare

Get your head out the gutters. I'm talking about walls. My rug came and I've added some pillows to the sectional and the living room is coming together, except all the walls in there are bare. Nude. Nada. Zilch. Check it out.

 I'm thinking of removing the ottoman and adding two high gloss lack tables side by side a la Jenny


Now that its coming together, I want a completely different room - with a leather chesterfield and brass etageres against deep navy walls with matching brass nesting coffee tables. Dark and moody. For now, I might do a series of smaller art pieces above the wall in different frames like these images from Lonny Mag. 


Apologies for all the jumping around in thought. My mind is never organized. In conclusion: I need to collect a horde of frames and vintage/original/diy art. It shouldn't take more than a decade to complete so stay tuned! 

(There are also new pictures of Ellie over here.) 

Thursday, July 11, 2013

DIY Tassel Garland: For People Who Can't Make Pom Poms

I tried making pom poms but they didn't work out... I kinda ended up shredding the paper as I was pulling it out from the center to make it in a ball. So, with the paper I had left, I made a tassel garland. I found the inspiration here:

I didn't have twine or a hot glue gun which you'll need if you follow the original instructions so I just used a LOT of string and one packet of tissue paper from Target which was $1.99, to come up with this. 


I know, the orange peel walls bug me too but I can't change them (#rentersproblems) so I'll just have to make do with some closet door makeovers later. Five easy instructions. 

1. Fold each sheet lengthwise.
2. Fold the sheet width wise. Your very long rectangle should now look like a less long rectangle. 
3. That width wise crease will be the top. Cut from the bottom up, leaving about two inches at the top. 
4. Unfold it all and roll the whole thing lengthwise. 
5. Twist the middles and wrap around with string, leaving a loop at the top. Pull through ribbon, string, etc and TA-DA!

I still want to add some white which is the tissue color I went to look for at Target at 10:55pm last night but they were out. This is currently too pink and coral for me - reminds me of a baby shower... for a girl... yea... Plus the white will work with all that string and my apartment is all gray, white, charcoal, navy blue... Yep... too much pink for me. I'll be back later with some white in it.


Monday, July 8, 2013

All the Little Pieces

We made a quick 30 minute trip to Ikea and grabbed some random things we needed like giant gray throw pillows for the living room to tie in to the rug which we ordered last week, white curtains, a lambskin, a living room clock, gray napkins (impulse buy), and dishtowels.
I've been sick so I haven't been able to put them away yet, plus last week I started on a wine crate bed for Ellie and a painting that I just spent five minutes on today to finish in semi-darkness due to a persistent migraine. Here's the painting though. 
It feels imperfect but if I paint more I think I would just make it worse. This is going to go up above the cabinet in the dining room... for now. Toodles! 


Saturday, June 22, 2013

You Are My Favorite

Remember this card from Fifi Du Vie that I included in my bedroom inspiration post?

I got a canvas double pack and just hand sketched my letters with a pencil , filling them in lightly with a plain sharpie. Always try to size and space out your letters before hand if you want your typography centered.

The bottom letters are slightly larger than the top - both lines have 8 letters but the top requires two spaces, so for both lines to start and end the same distance from the edge of the canvas, the bottom letters had to be a little bigger. Hopefully that makes sense. 

Pieces of the Living Room


Fireplacerug, swan textile via topshop (no longer available but could be replicated on Spoonflower), and Richloom Dixon fabric in graphite

The tripod lamp is already in there with the modern black sectional. I'm going to pick up on the orange bills on those swans and get a few solid orange pillows just so things aren't all black on black (which I LOVE - check out my closet). That Dixon fabric you might remember from the bedroom post where I'm using it in black against my upholstered bed so as you can see, my spaces are pretty monotone. I'm still working to get some basic pieces like a rug which I always go neutral just because it's easier to change out accessories or pillows later when I suddenly have a fascination with a new color. 

Oh, and I went with a large white shade - the Ikea Jara shade which was just $20 for an 18" drum shade! The white lights it up better since our living room has no overhead lighting, plus the larger shade just makes the entire lamp look so much more expensive. 

Thursday, June 13, 2013

DIY: Succulent Babies and Fake Mushrooms

I have had one succulent plant from last summer that sprouted three babies that started to hang over the pot on our patio, so I trimmed them off. I just made sure to keep the stems long on the succulent babies cause the stems will be what gets planted under the dirt. I originally wanted to put them in these speckled planters (the white round ones) from West Elm but I didn't have $89 to spend on a pot that was going to get filled with dirt.
So I just used an old thrifted fruit bowl I spruced up a few years ago by painting the rim a metallic golden bronze. It's almost the same mixture of paint I used on the top of the fake mushrooms I made a while back also. Here's what you'll need for those:
  • wire 
  • oven-bake clay and an oven, unless you are Daenerys Targaryen and have fire breathing dragon babies
  • craft paint and a brush
Cut your wire to the length desired for your mushrooms. I did lengths between two and three inches. Make the stem of your mushrooms by creating rolls of clay (wiener style) around the wire. The point of the wire is to give this stem structure and to help it stand up in the ground. I left a little wire at the bottoms to stick further into the dirt later. Now created tiny saucers out of clay and attach them to your stems. Bake in the oven as stated on your specific clay product. When cool, paint! Wit and Whistle has a way better tutorial with full on pictures if needed which is where I first saw it ever. 

Now that you have trimmed succulent babies and fake mushrooms, fill your spruced up trash to treasure bowl with some rocks at the bottom for drainage, then dirt, then plants and mushrooms.

Here is the finished product which was completely free thanks to using what I already had. 

Clearly these are iPhone pics... since... you can see the reflection... 

Tuesday, June 11, 2013

The New Mattress That Took Eternity To Get Here

We have an Ikea mattress. Of all the mattresses I have ever slept on in my life which includes the three inch toppers at the camp retreats, this is the worst. We needed a bed and our bedframe came with a mattress for $40 so we decided to save up for a good one later and just make do with this. It was fairly new and came with a cover so I washed it, sanitized it, washed it again and spent an  hour putting it back on. My fingers were raw. Fast forward about a year and we're waking up sore. As in it feels like someone beat us when we wake up. We have sore shoulders, collarbones, ribs, terrible back pain. The middle is dipped and there's no support anywhere. The past week I've been sleeping on the floor with my legs up on the bed because of the back pain (not completely the beds fault, I've had back problems for years now).

We finally bought a memory foam mattress four weeks ago. Ours was getting shipped from California, brand spanking new. They said it would ship in 2-3 business days. It shipped last week, after three weeks and it's now finally here, ready to be slept on. It's an eight inch thick memory foam mattress with an antimicrobial cover from Nature's Sleep. Best part after the fact that my back feels so much better after just two nights on it? It has a 20 year warranty. Now I just need a not-so-thick boxspring under it so I can "climb" into bed.

Sunday, June 9, 2013

Homemade Cat Toy

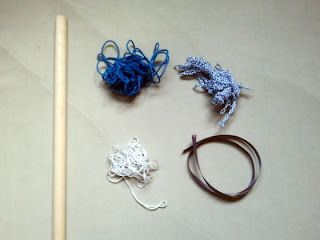
If you follow me on Instagram you may have seen the cat toy I made for Ellie a few weeks ago using some string and a 60 cents dowel. On my last trip to Michael's to pick up some more craft paint, I figured why not and grabbed another dowel to make a toy for a friends cat. Here's what you'll need:

 A dowel, string, and a drill and 3/16 drill bit. Measure about an inch down from the top of the dowel and drill a straight hole through the middle. Then, measure three feet of each string and thread through the hole. If you have trouble, tape the edges of the string to get it through the hole.
If you want,  you can paint the dowel too. I did navy blue, spring pasture, wedding cake white, and ballet slipper pink to create random width stripes. Tie the strings into a knot at the top, braid a few strings together, and knot all the bottoms of the strings to prevent fraying.

Father's Day 2013: Pampering Frugal, Practical Dads

Father's Day is next Sunday. One week from today. Every store is exclaiming they have the best deals and dads favorite toys and menswear is on sale everywhere. At the urging of retailers I decided I should get on it and start researching what to get my dad, possibly a blazer or coat. So, like every other child this time of year, I asked mom.

Now, my dad is notoriously difficult to shop for. Of course he has the taste for finer things in life but a life of hard work and hard saving have left him with some old habits that will never change. We grew up frugal. We spent on what we needed and our vacations rarely exceeded a camping trip. I am proud to be my father's daughter and I've had those same values instilled in me but I splurge sometimes. Blame it on my generation but honestly, my life has been more privileged than my father's life, bless America. Anyway, I wanted to get him something he could and would use every day and I came up with simple self care. He stands at work every day and plays soccer every weekend despite some back pain (he had disc surgery and uses an inversion table regularly).  I had read great reviews on Dr. Scholl's Pain Relief Orthotics so I grabbed a pair targeted for lower back pain, along with some Adidas sport performance socks for his soccer weekends. Those two things didn't seem enough so I started hunting for a simple skincare product and found Clinique's SPF Moisturizer, now that there's more sun meaning my dads face is going to turn seventeen shades darker. 

Also, for the socks, I added a personal touch via Hello Lucky. They recently updated their free printables for Father's Day 2013, including sock sleeves, cards, beer labels, etc. Hop on over to see their amazing freebies!

Date at the Market

Anyone who knows Seattle knows Pike's. It's where the fish mongers throw giant dead salmon, where blocks of flower vendors create bouquets til dusk, where the original Starbucks is (always busy), and where Le Panier is. J has a few friends who are bakers/supervisors there so we always stop by for some baked goods. They always smell so heavenly and I wish I had taken more pictures but it was packed and super warm in there (everything is baked on site so its usually pretty warm in there which is always nice since its usually cold and raining). Plus our friends weren't there so we decided no macarons (pictures of that next time) but I did snap these cookies.


Then we headed into the market for some fresh produce. It is pretty expensive compared to your local grocery store but everything is local and the fruit here is always so sweet. Like "I was picked when I was ready and ripe, not a month before so I could be shipped here" kinda taste. We'll go again on a less packed day for some more pictures. 


My favorite part: flowers GALORE. Winter doesn't have fresh flower bouquets so I usually wait til spring when I buy tulips for all over the apartment but after tulips come peonies, and I LOVE peonies too. 


We still had lots of daylight so we headed down to the Pier where there's a pirate haberdashery, lots of seafood restaurants, the Seattle Aquarium, seagulls everywhere, and the fairly new ferris wheel. 


We were both super hot and after paying $8 for parking we just hopped over to the closest restaurant and got a burger to split. I think I drank about four glasses of strawberry lemonade and J got some Mac N' Jacks beer. Reminder: it was HOT. Eating didn't take as long as we thought, we walked around the pier and contemplated taking a ferry ride to the island but decided we should plan a picnic for that later. We headed back to the car with thirty minutes left so we went to the Seattle Antiques Market which was a bust, but I did love these handles with just a bit of oriental touch. 


With that, we concluded our date. Honestly, we were a bit full from all the beverage drinking and walking was very uncomfortable with a full tummy in the heat. (Mothers in subtropical climates, I applaud you!) 

My First Grown Up Fan

We had a fan. From J's dad. It was entirely made of plastic except for the wire frame around the blades and the front and back of the frame were coming loose, spurring nightmares of the fan falling on my foot and chopping my toes off. The base was broken and light, so the fan tipped often and missing plastic pieces made the fan make clicking sounds when it oscillated left to right. And it was UGLY, people. Aesthetically displeasing, reminding me of all the hand-me-down crap fans we all had in our dormitories in college.

By now, you all know I'm a sucker for sales. Although I do justify them because I buy things I plan on buying anyway because we have a need for them, like a living room lamp and a fan for the bedroom for those randomly hot days and when Ellie likes to spray some new chair to claim it as her "territory." There are just oh so many joys of living with a feline :)

Head back one week ago from today and Target sent me a member email (yay RedCard) and advertised in its pages was my dream fan - the classic Hunter table fan. Down to $49.99 which was only a $5 sale but I had a $5 gift card and I could save 5% with my card. Total: $43.75. Yup. We're adventurous youngsters, shopping last minute on a Saturday night with discounts galore. As soon as we brought it home, Ellie commenced her smell test.


Don't mind the misplaced throw pillow and unmade bed. I'll post pictures of where I put it after I finish the bar *hint hint. 

Tuesday, June 4, 2013

Curtain Call

When I moved in, there were no curtains anywhere and on a time crunch and limited funds, I got these for $3.74. I know, cheapest curtain rods ever. Of course, when the curtains went up it was only a matter of time before the weight of the fabric was too much and the whole thing bent and I had saggy curtains. Last week we headed back to Target after some time researching on the internet for the best option.

It's clean, simple, modern and comes in an ORB finish and looks way more expensive than what I paid for. Plus, it holds up to 25 pounds! I can hang a hollow core door off this thing. Seriously. That's all we have in this house, crappy hollow core doors with holes in them from previous tenants. Anyway, up they went. 
They match the patio door frame finish and the middle piece totally helps with the no-bending-rod thing that was going on before. Sorry for the lame photo, it's from the phone and it was oddly bright here in Seattle last week. Happy Tuesday! 

Monday, June 3, 2013

It's Mine!

Two days ago, World Market had a lighting sale, 30% off any and all lighting. The telescope lamp I wanted was now $83 down from $120 and because the very last one available at our store had a screw that wouldn't thread correctly, we got it at a further discount for $70. On top of that I had a member's coupon for  10% off and a previous store credit for $30 so in total, I spent $35 for this giant floor lamp!
But alas... we came home and tried to assemble it but it also had a broken screw at the top where the bulb was supposed to go so it just kept flopping around. Determined to make this lamp a part of my apartment, I called another World Market, told them the situation, and put one of theirs on hold. I told them I got mine at a discount cause the unthreadable screw but they were super nice since we had to go through all this trouble to get a new one which we would have to pick up from the next city over that they just exchanged it right there. Now I just need to buy a lamp shade a la Nate Berkus.


© Door Three OH Seven 2012 | Blogger Template by Enny Law - Ngetik Dot Com - Nulis